
12 Ways to Improve Your Cutting
1. BUY THE BEST CUTTER YOU CAN AFFORD. If it helps you to cut accurately and comfortably, it will save you money in the long run. Look for a cutter with a comfortable handle and a high-quality, long-lasting wheel made of carbide steel. Inexpensive cutters designed for scoring float glass have neither of these features. A handle with a rest for the index finger will let you apply pressure down onto the score. A wide housing will allow your middle finger to guide the wheel. (Figure 1) 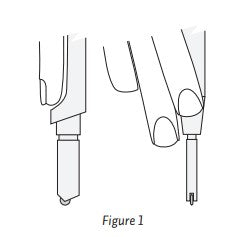
2. ALWAYS USE A CUTTING LUBRICANT. Cutting oil is the best lubricant. Use it to fill a self-lubricating cutter, dip your cutter into the oil, or apply the oil with a brush. (Figure 2)
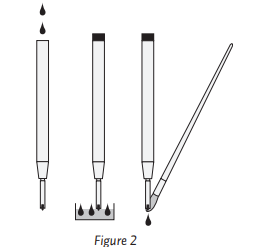
Remember to clean away the oil completely before firing the glass because any residue can cause devitrification. Some kilnworkers prefer to use mineral spirits for lubrication because it’s easier to clean than oil. However, cutting oil is a smoother lubricant and is not difficult to clean. Oil is also less harmful to skin and doesn’t smell.
3. USE THE CORRECT WHEEL FOR THE GLASS. The size of the wheel determines how much pressure you need to penetrate the surface of the glass. The smaller the wheel, the less pressure is needed. Small wheels with a diameter of about 1/10th of an inch (like those on the Silberschnitt 2000 and Toyo cutters) are best for thin and standard thickness art glass. The angle of the wheel also affects the pressure needed. For cutting most glasses up to 10mm (≈ .375") thick, we recommend the versatility of 135° angle. For 2mm (.0625”) thin sheets a 120° is excellent. For glasses thicker than 10mm, a 160° angle is appropriate. (Figure 3)
4. MAKE SURE THE TEMPERATURE OF YOUR GLASS IS OPTIMAL FOR CUTTING. When glass is cold, it can become more difficult to cut. Comfortable room temperature conditions are favorable. If your glass is cold, consider warming it up before attempting to cut it.
5. WORK WITH YOUR FULL BODY. For the most uniform score, stand up and away from the worktable. Keep the cutter wheel perpendicular to the glass with the handle held upright or slightly angled back toward your body. Then move your whole body—not just your arm or hand— for the most uniform score. (Figure 4)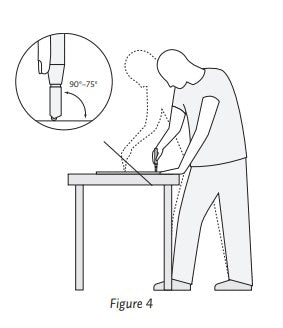
When scoring severe curves, work at the corner of your worktable and move around the table as you cut.
6. SCORE THE SMOOTHER SIDE OF YOUR GLASS. With art glass, often one side is smoother than the other. You’ll find that scoring on the smoother surface is easier and leads to cleaner breaks. 120° 135° 160° Figure 1 Figure 2 Figure 3 Figure 4 90º–75º
7. IF POSSIBLE, POSITION YOUR SCORE SO THAT THERE IS AN EQUAL MASS OF GLASS ON EITHER SIDE OF THE SCORE. Otherwise, the break below the scoreline will naturally tend to move to the side where there is less glass, resulting in an edge that flares out from your score on the bottom side of the sheet. (Figure 5)
If you’re cutting numerous thin strips, start with a piece that is four times as wide as the strips you need. Cut it exactly in half. Then cut each half in half. (Figure 6)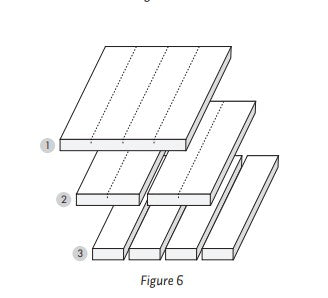
By always keeping an equal amount of glass on each side of your score line, you can get perfect strips that are as narrow as the glass is thick.
8. CONCENTRATE ON APPLYING UNIFORM PRESSURE AND USING CONSISTENT SPEED. Listen for a smooth consistent sound as you score. It should not be scratchy. However, when scoring opalescent glasses with the correct amount of pressure, you may hear no sound at all. Want to compare the pressure needed for different cutters or different glasses? Try putting your glass on a scale while you score. (Figure 7)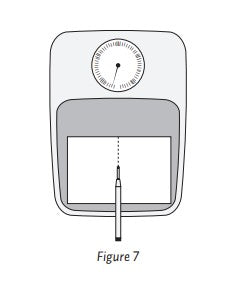
Notice the difference in “weight” required.
9. NEVER SCORE TWICE OVER THE SAME PATH. If you make a bad score, do not re-score the same line on the same side of the glass. You’ll dull the cutter wheel and lessen your chances for a clean break. If you absolutely must break the glass along a line that is poorly scored, turn the glass over and very carefully score along the same line. Then break it as usual.
10. WHEN CUTTING CURVES, CONSIDER RUNNING YOUR SCORE FROM THE INTERIOR OF THE SHEET. Consider how glass naturally breaks when you start to run a score. It tends to run as directly as possible to the edge of the piece. Therefore, if possible, when cutting complex shapes, start running your complex curves or circles away from the edge. (Figure 8)

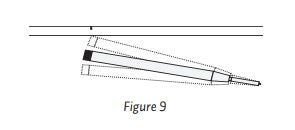
11. AVOID TAPPING WHENEVER POSSIBLE. Tapping almost always leaves a jagged edge. But if you must, tap directly under the score line to minimize flared edges. (Figure 9)
12. BREAK OUT YOUR GLASS IMMEDIATELY AFTER SCORING. If allowed to sit too long, a scoreline will begin to develop fractures radiating along its entire length. Such fractures make it nearly impossible to run the score cleanly. These tips are courtesy of Rudi Gritsch of the Glasfachschule in Kramsach, Austria. Rudi is a former Director of Research at Bullseye Glass Co. and a world-class glasscutter.
To keep this great tip sheet handy - copy the Pdf.
Leave a comment